On-premises
On-premises
For on-premises (self-hosted) deployments, the MCP server runs inside your own network and may not be reachable from the public internet, so the typical connection flow may not work.
The Polytomic Connector is a Claude Desktop extension that bridges Claude Desktop to your on-premises Polytomic MCP server. It runs on your machine, where the MCP server is reachable, and authenticates with a Polytomic API key. This guide walks through installing and configuring it.
When to use this connector
Use the Polytomic Connector when your Polytomic MCP server is only reachable from within your network (for example, a private-cloud or VPN-gated deployment). If your MCP server is publicly reachable, you can use Claude’s standard remote MCP connector instead.
Prerequisites
- Claude Desktop, with the Polytomic Connector extension installed (see below).
- The URL of your Polytomic MCP server, e.g.
https://mcp.polytomic.mycompany.com. Your MCP server must be reachable from the machine running Claude Desktop. - A Polytomic API key. Create one in Polytomic under Settings → API keys.
Private and internal certificates
The connector loads your operating system’s trust store at startup, so an MCP server secured with an internal or private certificate authority is verified automatically.
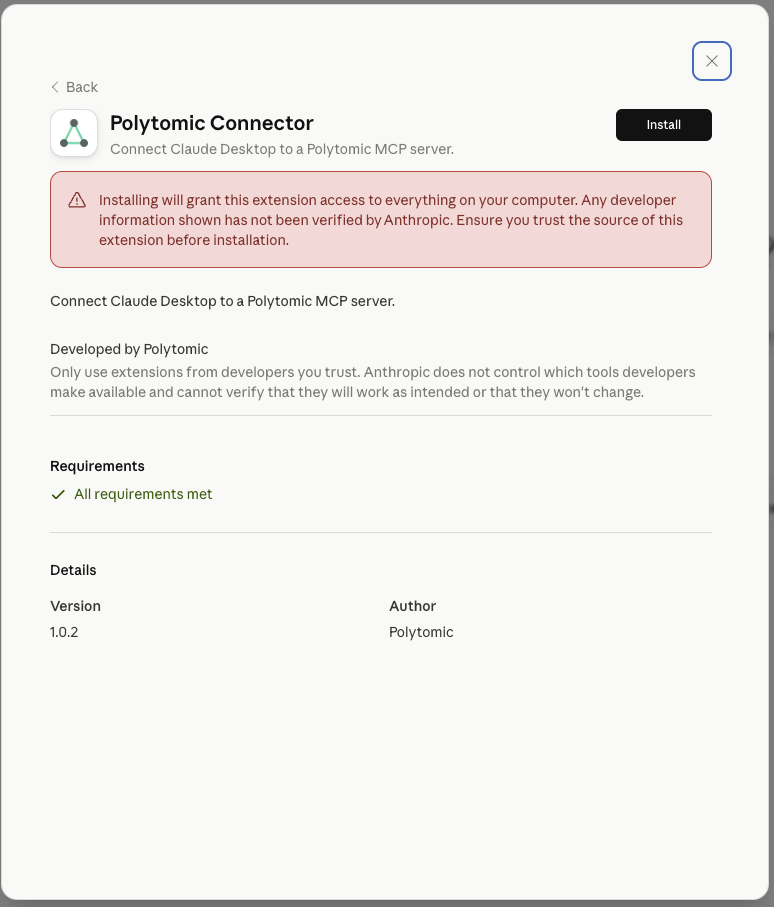
Install the connector
- Download the latest version of the connector (
polytomic-connector.mcpb) from the connector releases on GitHub. - Double-click the file to open it in Claude Desktop.
- Review the details, then click Install.
Install dialog doesn't appear?
If double-clicking the file opens Claude Desktop but no install dialog appears, your organization may have disabled side-loaded extensions. Use manual configuration instead.
Configure the connector
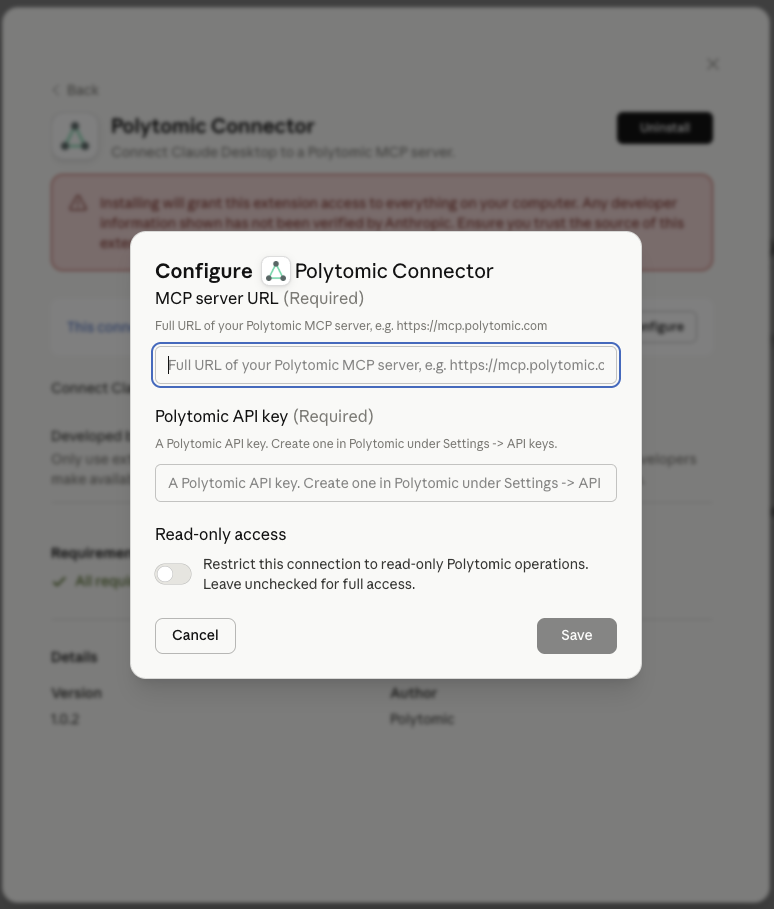
After installing, click Configure and fill in the connection settings:
- MCP server URL (required) — the full URL of your Polytomic MCP server, e.g.
https://mcp.polytomic.mycompany.com. - Polytomic API key (required) — a Polytomic API key. Create one in Polytomic under Settings → API keys.
- Read-only access (optional) — turn this on to restrict the connection to read-only Polytomic operations. Leave it off for full access.
Click Save.
Read-only mode
When read-only access is enabled, the connector tells the MCP server to allow only read operations. Use this when you want Claude to explore and report on your Polytomic deployment without making changes.
Enable the connection
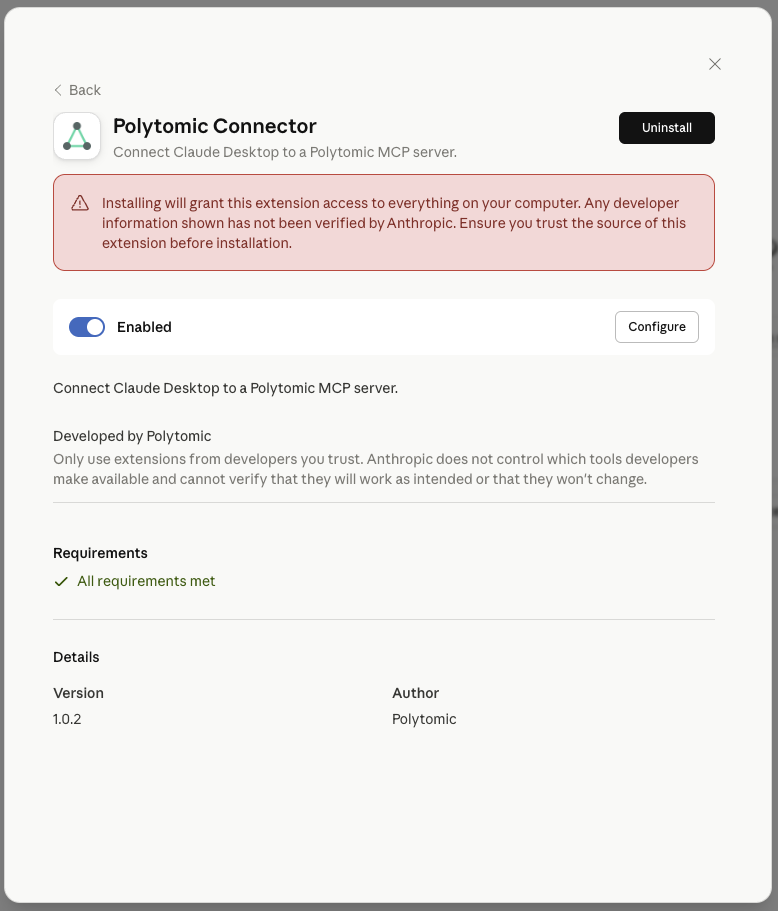
After configuring the extension click the Enabled toggle to connect. You can change the settings any time by clicking Configure, or remove the connector with Uninstall.
Start a new chat in Claude Desktop and ask about your Polytomic deployment to confirm the connection is working.
Configure manually (without the connector extension)
If you can’t install the connector extension — for example, your organization disables side-loaded Claude Desktop extensions — you can configure the same connection by hand. This bridges Claude Desktop to your on-premises MCP server over stdio using mcp-remote, exactly as the connector does internally.
When to use manual configuration
The connector extension is the recommended path. Use manual configuration only when you can’t install the extension. The result is the same: Claude Desktop connects to your on-premises MCP server with your Polytomic API key.
Prerequisites
- Node.js installed on your machine. The manual bridge runs via
npx, and Claude Desktop does not provide anodeornpxyou can use for this — it spawns whatever is on your systemPATH. - The URL of your Polytomic MCP server and a Polytomic API key, as in the Prerequisites above.
Edit the Claude Desktop config
-
Open Claude Desktop’s configuration file (
claude_desktop_config.json):- macOS:
~/Library/Application Support/Claude/claude_desktop_config.json - Windows:
%APPDATA%\Claude\claude_desktop_config.json
You can also reach it from Settings → Developer → Edit Config.
- macOS:
-
Add a
polytomicentry undermcpServers, replacing the URL and API key with your own:The server URL must include the
/mcppath. To restrict the connection to read-only Polytomic operations, add"--header", "X-Polytomic-Access-Mode:read-only"to theargsarray. -
Save the file and fully restart Claude Desktop.
Start a new chat and ask about your Polytomic deployment to confirm the connection is working.
Internal or private certificates
Unlike the connector extension, the manual bridge runs as its own Node.js process, so it does not automatically load your OS trust store. If your MCP server uses an internal or private certificate authority, point Node at your CA bundle by adding "NODE_EXTRA_CA_CERTS": "/path/to/your-ca.pem" to the env block (or "NODE_OPTIONS": "--use-system-ca" on Node 22+ to use the system trust store).
Troubleshooting
- Cannot reach the MCP server — confirm the machine running Claude Desktop can reach the MCP server URL (for example, that you are on the VPN). The connector runs on your machine, so the server only needs to be reachable from there, not from Anthropic.
- Authentication errors — verify the API key is valid and has not been revoked. Create a new key in Polytomic under Settings → API keys if needed.
- Certificate errors — the connector trusts your OS certificate store. If verification fails, ensure your internal certificate authority is installed in your operating system’s trust store. With manual configuration, set
NODE_EXTRA_CA_CERTSinstead, as described above. npxornodenot found (manual setup) — install Node.js on your machine and restart Claude Desktop so it can launch the bridge.